• Home
  • Linux
  • Docker
  • Windows
    • PS
    • C#
    • Exchange Server
  • Other
    • Perl
    • IPV6
    • MacOS
  • DB
    • MSSQL
    • MariaDB
    • PG

Poor Network Performance on Hyper-V VMs

Details
Written by: po3dno
Category: Windows
Created: 02 February 2022
Hits: 1269

Virtual Machine Queue (VMQ) Mode in Network Adapter Driver

In some cases, if VMQ (Virtual Machine Queue) is enabled in a network adapter driver of a physical Hyper-V host, it may result in poor network performance in Hyper-V virtual machines. VMQ is a hardware feature and if it is not supported by your hardware but enabled in the driver, it can result in packet loss and increased network latency. The problem is typical to Broadcom Gigabit network adapters and occurs in all Hyper-V versions (Windows Server 2012 R2/2016/2019).

VMQ is designed to improve network performance by directly forwarding packets from a physical network adapter to virtual machines.

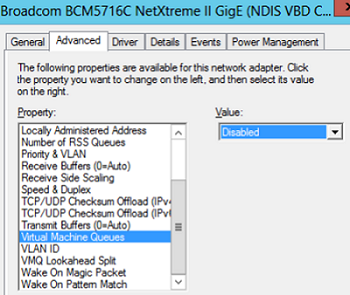
You can disable VMQ in the properties of your network adapter driver.

disable VMQ (Virtual Machine Queue) in NIC driver settings

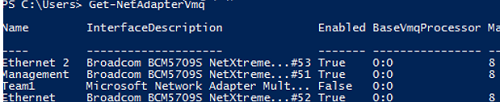
Or you can display a list of network adapters with VMQ support and their status using PowerShell:

Get-NetAdapterVmq

To disable VMQ for a specific NIC, run the command below (the network adapter will be unavailable for a couple of seconds):


Set-NetAdapterVmq -Name “NICName” -Enabled $False

check if vmq is enabled in NIC - powershell

After disabling VMQ, it is better to restart the host and check the network performance.

Make sure that QoS bandwidth limit policies are disabled in Windows.

Optimize TCP Settings for Hyper-V on Windows Server 2019

Save the current TCP settings on your Hyper-V host and apply new settings that will make TCP settings in Windows Server 2019 almost similar to those of Windows Server 2016.

Save the current settings:

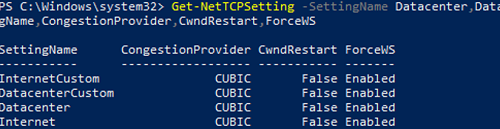
Get-NetTCPSetting -SettingName Datacenter,DatacenterCustom,InternetCustom,Internet|select SettingName,CongestionProvider,CwndRestart,ForceWS|Export-csv c:\backup\ws2019_network_stack_settings_nettcp_backup.csv

By default in Windows Server 2019 and Windows 10 1709+, the CUBIC implementation of TCP is used. This algorithm is optimized for high-speed networks with high latency (it is also used by default in Linux kernel 2.6.19 and newer).

Windows TCP stack on Windows Server 2019 based on CUBIC


Apply the following settings only in Windows Server 2019 or Hyper-V 2019.

Apply new NetTCP settings for LAN:

Set-NetTCPSetting -SettingName DatacenterCustom,Datacenter -CongestionProvider DCTCP
Set-NetTCPSetting -SettingName DatacenterCustom,Datacenter -CwndRestart True
Set-NetTCPSetting -SettingName DatacenterCustom,Datacenter -ForceWS Disabled

For WAN:

Set-NetTCPSetting -SettingName InternetCustom,Internet -CongestionProvider CTCP
Set-NetTCPSetting -SettingName InternetCustom,Internet -DelayedAckTimeoutMs 50
Set-NetTCPSetting -SettingName InternetCustom,Internet -ForceWS Disabled

Disable network RSS and RSC network optimization methods at the TCP stack level:

netsh int tcp show global
netsh int tcp set global RSS=Disabled
netsh int tcp set global RSC=Disabled

or on the NIC level:

Get-NetAdapter | Set-NetAdapterAdvancedProperty -DisplayName "Recv Segment Coalescing (IPv4)" -DisplayValue "Disabled" -NoRestart
Get-NetAdapter | Set-NetAdapterAdvancedProperty -DisplayName "Recv Segment Coalescing (IPv6)" -DisplayValue "Disabled" -NoRestart
Get-NetAdapter | Set-NetAdapterAdvancedProperty -DisplayName "Receive Side Scaling" -DisplayValue "Disabled" –NoRestart

Disable vRSS for all VMs:

Get-VM | Set-VMNetworkAdapter -VrssEnabled $FALSE

Disable Large Send Offload (LSO) on NICs:
Get-NetAdapter | Set-NetAdapterAdvancedProperty -DisplayName "Large Send Offload Version 2 (IPv4)" -DisplayValue "Disabled" -NoRestart
Get-NetAdapter | Set-NetAdapterAdvancedProperty -DisplayName "Large Send Offload Version 2 (IPv6)" -DisplayValue "Disabled" -NoRestart
Get-NetAdapter | Restart-NetAdapter

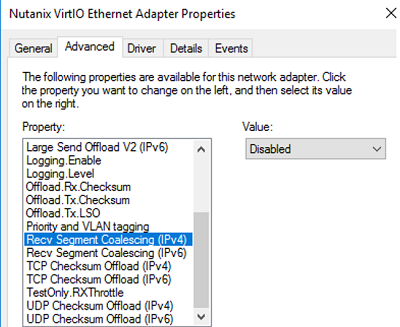
You can also disable these options in the Advanced tab of your network adapter properties:


  • Recv Segment Coalescing (IPv4/IPv6) = Disabled
  • Large Send Offload V2 (IPv4/IPv6) = Disabled

disable recv segment coalescing on hyper-v


These TCP stack settings will make Windows Server 2019 network protocol settings similar to those of previous Windows Server versions.

Windows 11, taskbar corner overflow, show all tray icons

Details
Written by: po3dno
Category: Windows
Created: 01 January 2022
Hits: 1179

Here is a workaround :

  • Click the Start or Search icon in the Taskbar
  • Type cmd, right-click on Command Prompt, and then click Run as administrator
  • Copy and paste the following: explorer shell:::{05d7b0f4-2121-4eff-bf6b-ed3f69b894d9}
  • Press Enter
  • Select "Always show all icons and notifications on the taskbar"
  • Click OK

If the checkbox "Always show all icons ..." is greyed out, I'm not totally sure what fixed it yet but it appears that changing the EnableAutoTray value in the Regedit helped.

To do so, open Regedit, go here:

[HKEY_CURRENT_USER\SOFTWARE\Microsoft\Windows\CurrentVersion\Explorer]

Then set EnableAutoTray to 1

LDAP

Details
Written by: po3dno
Category: Windows
Created: 30 September 2021
Hits: 1162

Условия LDAP

Фильтр определяет необходимые условия  для  включения объекта в результат запроса. LDAP-фильтр может содержать одно или более условий. 
Результат условия - "Истина" или "Ложь". Общий вид фильтра

(<Атрибут AD><оператор сравнения><значение>)

<Атрибут AD> - LDAP-имя атрибута AD. Операторы сравнения

Оператор Значение
= Равенство
>= Больше или равно
<= Меньше или равно

Read more …

Sleep unattended idle timeout

Details
Written by: po3dno
Category: Windows
Created: 14 January 2021
Hits: 1254

https://docs.microsoft.com/en-us/windows-hardware/customize/power-settings/sleep-settings-sleep-unattended-idle-timeout

3. Right-click on regedit icon, click Run as administrator
4. Go to HKEY_LOCAL_MACHINE\SYSTEM\CurrentControlSet\Control\Power\PowerSettings\238C9FA8-0AAD-41ED-83F4-97BE242C8F20\7bc4a2f9-d8fc-4469-b07b-33eb785aaca0
5. Double click on Attributes
6. Enter number 2.
7. Go to Advanced power settings (click on Windows button, write power options, click on Power Options, in the selected plan click on the Change plan settings, click on the Change advanced power settings).
8. Click on the Change settings that are currently unavailableMinimum value


0 (Never idle to sleep) (

Схемы электропитания

Details
Written by: po3dno
Category: Windows
Created: 14 January 2021
Hits: 1218

Отсутствие схем электропитания вероятнее всего связано с новым режимом питания на устройствах с аккумулятором в версии 1709 . Если щелкнуть значок батареи, то можно видеть слайдер, который появится только, если выбрана схема «Сбалансированная».


Изображение


Схемы можно восстановить следующими способами: сделать схему «Высокая производительность» или «Экономия энергии» активной, при этом активная схема появится в Панели управления, или же создать дубликаты этих схем, и тогда появятся обе схемы. В Командной строке нужно выполнить команды.


Сделать схему активной: powercfg.exe /setactive <GUID схемы питания>


Создать дупликат схемы: powercfg -duplicatescheme <GUID схемы питания>


Вместо <GUID схемы питания> нужно вставить GUID соответствующей схемы.


Для схемы "Сбалансированная" - 381b4222-f694-41f0-9685-ff5bb260df2e


Для схемы "Экономия энергии" - a1841308-3541-4fab-bc81-f71556f20b4a


Для схемы "Высокая производительность" - 8c5e7fda-e8bf-4a96-9a85-a6e23a8c635c
  1. Performance Tuning: Network Subsystem Part 2

Page 5 of 6

  • 1
  • 2
  • 3
  • 4
  • 5
  • 6

Login Form

  • Forgot your password?
  • Forgot your username?

Statistics

  • Users 3
  • Articles 179
  • Articles View Hits 179511