Home
- Details
- Written by: po3dno
- Category: Windows
- Hits: 615
If you get this message trying to install Windows 11, you can bypass it with the following steps:
- Press Shift+F10 to open Command Prompt and type in
regedit.exeto launch Registry Editor. - Navigate to HKEY_LOCAL_MACHINE\SYSTEM\Setup
- Right click on the Setup key on the left size and choose New -> Key.
- Create a key (Раздел) named
LabConfig - Select the LabConfig key.
- Create two new values: Choose New -> DWORD (32-bit) and create
BypassTPMCheckandBypassSecureBootCheck. Set both values to 1. - Close out of Registry Editor and Command Prompt.
- In setup, press the back button and then Next to continue installation.
- Details
- Written by: po3dno
- Category: Windows
- Hits: 648
A pending reboot is defined in many places. Scroll right to see the values and conditions. A Windows computer is pending a reboot if any of the conditions in this table are true.
| Key | Value | Condition |
| HKLM:\SOFTWARE\Microsoft\Updates | UpdateExeVolatile | Value is anything other than 0 |
| HKLM:\SYSTEM\CurrentControlSet\Control\Session Manager | PendingFileRenameOperations | value exists |
| HKLM:\SYSTEM\CurrentControlSet\Control\Session Manager | PendingFileRenameOperations2 | value exists |
| HKLM:\SOFTWARE\Microsoft\Windows\CurrentVersion\WindowsUpdate\Auto Update\RebootRequired | NA | key exists |
| HKLM:\SOFTWARE\Microsoft\Windows\CurrentVersion\WindowsUpdate\Services\Pending | NA | Any GUID subkeys exist |
| HKLM:\SOFTWARE\Microsoft\Windows\CurrentVersion\WindowsUpdate\Auto Update\PostRebootReporting | NA | key exists |
| HKLM:\SOFTWARE\Microsoft\Windows\CurrentVersion\RunOnce | DVDRebootSignal | value exists |
| HKLM:\Software\Microsoft\Windows\CurrentVersion\Component Based Servicing\RebootPending | NA | key exists |
| HKLM:\Software\Microsoft\Windows\CurrentVersion\Component Based Servicing\RebootInProgress | NA | key exists |
| HKLM:\Software\Microsoft\Windows\CurrentVersion\Component Based Servicing\PackagesPending | NA | key exists |
| HKLM:\SOFTWARE\Microsoft\ServerManager\CurrentRebootAttempts | NA | key exists |
| HKLM:\SYSTEM\CurrentControlSet\Services\Netlogon | JoinDomain | value exists |
| HKLM:\SYSTEM\CurrentControlSet\Services\Netlogon | AvoidSpnSet | value exists |
| HKLM:\SYSTEM\CurrentControlSet\Control\ComputerName\ActiveComputerName | ComputerName | Value ComputerName in HKLM:\SYSTEM\CurrentControlSet\Control\ComputerName\ComputerName is different |
- Details
- Written by: po3dno
- Category: Windows
- Hits: 725
Single-user and multi-users OSs:
-
In the latest Windows code, set the following location in the registry to 0
HKEY_CURRENT_USER\SOFTWARE\Microsoft\Windows Search\SetupCompletedSuccessfully(DWord)
Doing so will trigger Windows Search Indexer to cleanup obsolete artifacts and rebuild a new user catalog for the particular user. On the latest Windows releases (expected on 1809 and above, but subject to change) that has this feature, the registry key above is set to 1 after a catalog is successfully created. An absence of this registry key may indicate that the Windows version is older and lacks this newer feature.
-
If this key is missing, then it may still be possible to trigger a rebuild by deleting the following folder: C:\Users\<Username>\AppData\Roaming\Microsoft\Search\Data\Applications
NOTE: It is intended, but not yet validated, to keep the SetupCompletedSuccessfully registry key value change (as noted above) to serve this particular purpose for future versions. However, please note that the steps above are for troubleshooting/debugging purposes only (especially the second option for legacy behavior). We reserve the right to change this behavior at any time as necessary.
Note: for database size the following as values to use for estimates. Significant deviation from these values will typically be something to investigate.
- Usually, 10-20K per indexed item would be estimated for database size.
- For Outlook only data, use the higher side (20k) since they are pure text rich content
- Details
- Written by: po3dno
- Category: Windows
- Hits: 980
WMIC.EXE /namespace:\\root\microsoftdfs path dfsrreplicatedfolderconfig get replicatedfolderguid,replicatedfoldername
Then call the CleanupConflictDirectory method:
WMIC.EXE /namespace:\\root\microsoftdfs path dfsrreplicatedfolderinfo where "replicatedfolderguid='<RF GUID>'" call cleanupconflictdirectory
Example output with a sample GUID:
WMIC.EXE /namespace:\\root\microsoftdfs path dfsrreplicatedfolderinfo where "replicatedfolderguid='70bebd41-d5ae-4524-b7df-4eadb89e511e'" call cleanupconflictdirectory
- Details
- Written by: po3dno
- Category: Windows
- Hits: 1190
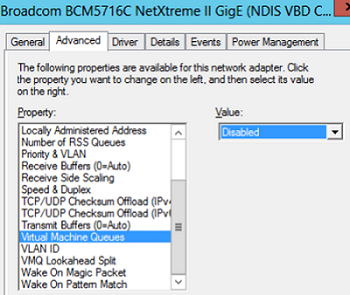
Virtual Machine Queue (VMQ) Mode in Network Adapter Driver
In some cases, if VMQ (Virtual Machine Queue) is enabled in a network adapter driver of a physical Hyper-V host, it may result in poor network performance in Hyper-V virtual machines. VMQ is a hardware feature and if it is not supported by your hardware but enabled in the driver, it can result in packet loss and increased network latency. The problem is typical to Broadcom Gigabit network adapters and occurs in all Hyper-V versions (Windows Server 2012 R2/2016/2019).
You can disable VMQ in the properties of your network adapter driver.
Or you can display a list of network adapters with VMQ support and their status using PowerShell:
Get-NetAdapterVmq
To disable VMQ for a specific NIC, run the command below (the network adapter will be unavailable for a couple of seconds):
Set-NetAdapterVmq -Name “NICName” -Enabled $False
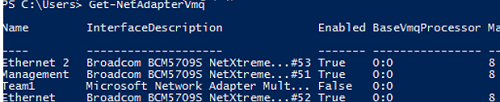
After disabling VMQ, it is better to restart the host and check the network performance.
Optimize TCP Settings for Hyper-V on Windows Server 2019
Save the current TCP settings on your Hyper-V host and apply new settings that will make TCP settings in Windows Server 2019 almost similar to those of Windows Server 2016.
Save the current settings:
Get-NetTCPSetting -SettingName Datacenter,DatacenterCustom,InternetCustom,Internet|select SettingName,CongestionProvider,CwndRestart,ForceWS|Export-csv c:\backup\ws2019_network_stack_settings_nettcp_backup.csv
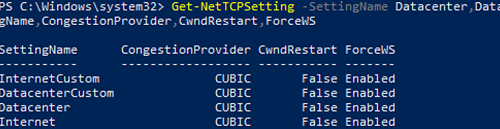
Apply new NetTCP settings for LAN:
Set-NetTCPSetting -SettingName DatacenterCustom,Datacenter -CongestionProvider DCTCP
Set-NetTCPSetting -SettingName DatacenterCustom,Datacenter -CwndRestart True
Set-NetTCPSetting -SettingName DatacenterCustom,Datacenter -ForceWS Disabled
For WAN:
Set-NetTCPSetting -SettingName InternetCustom,Internet -CongestionProvider CTCP
Set-NetTCPSetting -SettingName InternetCustom,Internet -DelayedAckTimeoutMs 50
Set-NetTCPSetting -SettingName InternetCustom,Internet -ForceWS Disabled
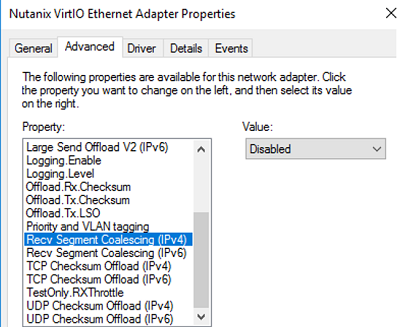
Disable network RSS and RSC network optimization methods at the TCP stack level:
netsh int tcp show global
netsh int tcp set global RSS=Disabled
netsh int tcp set global RSC=Disabled
or on the NIC level:
Get-NetAdapter | Set-NetAdapterAdvancedProperty -DisplayName "Recv Segment Coalescing (IPv4)" -DisplayValue "Disabled" -NoRestart
Get-NetAdapter | Set-NetAdapterAdvancedProperty -DisplayName "Recv Segment Coalescing (IPv6)" -DisplayValue "Disabled" -NoRestart
Get-NetAdapter | Set-NetAdapterAdvancedProperty -DisplayName "Receive Side Scaling" -DisplayValue "Disabled" –NoRestart
Disable vRSS for all VMs:
Get-VM | Set-VMNetworkAdapter -VrssEnabled $FALSE
Disable Large Send Offload (LSO) on NICs:Get-NetAdapter | Set-NetAdapterAdvancedProperty -DisplayName "Large Send Offload Version 2 (IPv4)" -DisplayValue "Disabled" -NoRestart
Get-NetAdapter | Set-NetAdapterAdvancedProperty -DisplayName "Large Send Offload Version 2 (IPv6)" -DisplayValue "Disabled" -NoRestart
Get-NetAdapter | Restart-NetAdapter
- Recv Segment Coalescing (IPv4/IPv6) = Disabled
- Large Send Offload V2 (IPv4/IPv6) = Disabled
These TCP stack settings will make Windows Server 2019 network protocol settings similar to those of previous Windows Server versions.