Home
- Details
- Written by: po3dno
- Category: Other
- Hits: 583
Issue
Converting VMware vmdk disks to Hyper-V vhdx using Microsoft Virtual Machine Converter 3.0 PowerShell module (ConvertTo-MvmcVirtualHardDisk) fails with error:
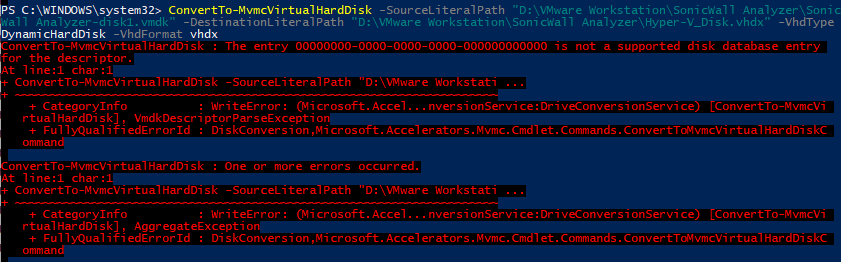
ConvertTo-MvmcVirtualHardDisk : The entry 00000000-0000-0000-0000-000000000000 is not a supported disk database entry for the descriptor...
Resolution
the issue is caused by VMDK file descriptor entries that Microsoft Converter doesn't recognise. To resolve the issue we need to remove these non-recognised entries:
- Download and extract dsfok tool.
dsfo (by Dariusz Stanislawek) can save a block of data of any size from any location within a file. We'll use it to extract descriptor from VMDK file, and then save modified version back into the VMKD. - Extract VMDK descriptor by running:
dsfo.exe "D:\PathToVMDK\disk1.vmdk" 512 1024 "D:\PathToVMDK\descriptor.txt" - Open descriptor.txt with Notepad++ or other text editor. It will look something like this:
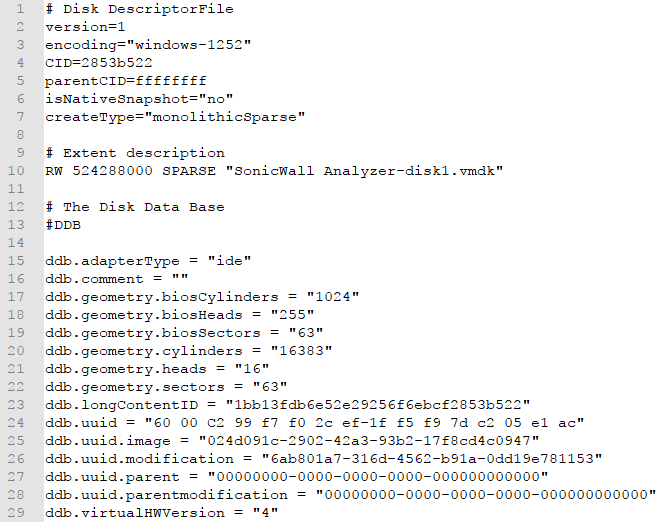
- Find the line that appeared in the error above and comment it out by adding # in front of the line. Save the file.
The error above will only list the first offending entry, so you may need to repeat the process few times until you find and remove all problematic entries. In the example above I had to comment out following lines:- ddb.comment = ""
- ddb.uuid.image = "024d091c-2902-42a3-93b2-17f8cd4c0947"
- ddb.uuid.modification = "6ab801a7-316d-4562-b91a-0dd19e781153"
- ddb.uuid.parent = "00000000-0000-0000-0000-000000000000"
- ddb.uuid.parentmodification = "00000000-0000-0000-0000-000000000000"
- Save VMDK descriptor back int VMDK file by running:
dsfi.exe "D:\PathToVMDK\disk1.vmdk" 512 1024 "D:\PathToVMDK\descriptor.txt" - Try running ConvertTo-MvmcVirtualHardDisk again. If you get similar error with different entry, repeat the process from step 2.
- Details
- Written by: po3dno
- Category: Windows
- Hits: 635
+ Build new Server 2019 machine
# could be 2016 or even 2012R2
- vCPU = 4, vSocket = 1, RAM = 12 GB, PageFile = 32768 MB
- HDD1 = 150 GB, used for C drive (System)
- HDD2 = 3500 GB, used for D drive (WSUS data & content store, SQL Backup)
- HDD3 = 50 GB, used for G drive (SQL Data)
- HDD4 = 40 GB, used for H drive (SQL Temp DB)
- HDD5 = 40 GB, used for L drive (SQL Log)
+ Install SQL Server 2019 Standard
+ Update Windows & SQL server with Microsoft Online Updates
+ Add WSUS role
+ Configure WSUS role
- Update Files and Languages: Update Files tab, tick Download express installation files. Click OK
- Automatic Approvals: Tick the Default Automatic Approval Rule. Change the rule so that ONLY “Approve the update for all computers” is shown. Click the Advanced tab. Ensure all check boxes are ticked. Click OK
- E-Mail Notifications: Tick Send status report, set to Weekly, set time to 7.30am, set Recipient
- Set the outgoing SMTP server
- Personalization: Click round selector “Show Computer and status from this server alone”
+ Install WSUS reporting
- Find CLR type for SQL Server 2012 MSI and install. Its a challenge as the file is no longer on the Microsoft catalog site.
- Find Report Viewer MSI and install.
+ Optimize WSUS Configuration
# The need is to modify web.config parameters. Within an elevated CMD shell;
- sc stop wsusservice
- cd "C:\Program Files\Update Services\WebServices\ClientWebService"
- takeown /f web.config
- icacls web.config /grant administrator:(F)
- copy web.config web.config.org
- notepad web.config
# Find line;
<add key="maxInstalledPrerequisites" value="400"/>
# change this line to
<add key="maxInstalledPrerequisites" value="800"/>
# Find remark “MAXREQUESTLENGTH”, and then move to the line starting with
<httpRuntime maxRequestLength="4096" />
# change this line to
<httpRuntime maxRequestLength="204800" executionTimeout="7200" />
# Save web.config and exit notepad
+ Optimize IIS Configuration
# Within an elevated CMD shell;
- # Run IIS Admin
- %windir%\system32\inetsrv\inetmgr.exe
- # Navigate to <servername> \ Application Pools \
- # Right click on “WsusPool” and select Advanced Settings.
- # Make the following changes in the respective sub-sections shown in front left column;
General
Queue Length = 25000
Rapid-Fail Protection
“Service Unavailable” Response = TcpLevel
Failure Interval (minutes) = 15
Maximum Failures = 5
Recycling
Private Memory Limit (KB) = 0
Request Limit = 0
Virtual Memory Limit (KB) = 0
+ Restart Computer
- After 5 minutes, initiate testing on the WUA machine. No errors should occur, although scanning may take many minutes, even over an hour of slow low bandwidth WAN links.
- Results may include either no updates available which most likely means the WSUS is still updating its self (which can take days), or available updates are shown and are available for WUA to download and install.
- Details
- Written by: po3dno
- Category: Windows
- Hits: 582
control /name Microsoft.IndexingOptions
- Details
- Written by: po3dno
- Category: Power Shell
- Hits: 744
The Set-Service cmdlet changes the properties of a service, along with the starting and stopping of a service.
Before setting the log-on account information for a service, we need to capture the credentials. The credentials can come from user input:
# Prompt for credentials
$Credential = Get-Credential

# Prompt for credentials with message
$Credential = Get-Credential -UserName domain\user -Message 'Enter Password for Service Account'